How to Run the Z-Image Workflow in the Promptus ComfyUI
%20(2).avif)
%20transparent.avif)

Zimage AI model delivers photography-level realism, fast inference, powerful world understanding, and bilingual text rendering.
Alibaba’s Z-Image model is one of the most advanced open-source image generators available today — delivering photography-level realism, fast inference, powerful world understanding, and bilingual text rendering.
In this tutorial, you’ll learn exactly how to use Z-Image inside the Promptus app, even if you’re brand new to ComfyUI or node-based generation.
This guide teaches you step-by-step:
- What you need
- How to load the Z-Image workflow
- How to set up the models
- How to run your first generation
- How to use image-to-image
- How to use LoRAs
- How to get the best results
Let’s get started!
✅ 1. What You Need Before You Start
Promptus simplifies everything — you do not need to manually install ComfyUI.
You’ll need:
- The Promptus app (latest version)
- ~12–16GB VRAM GPU recommended
(but quantized GGUF versions can run on 4GB VRAM) - Internet connection for downloading models
Promptus handles:
✔ model downloading
✔ workflow loading
✔ folder management
✔ node linking
✔ graph execution
You only focus on creating.
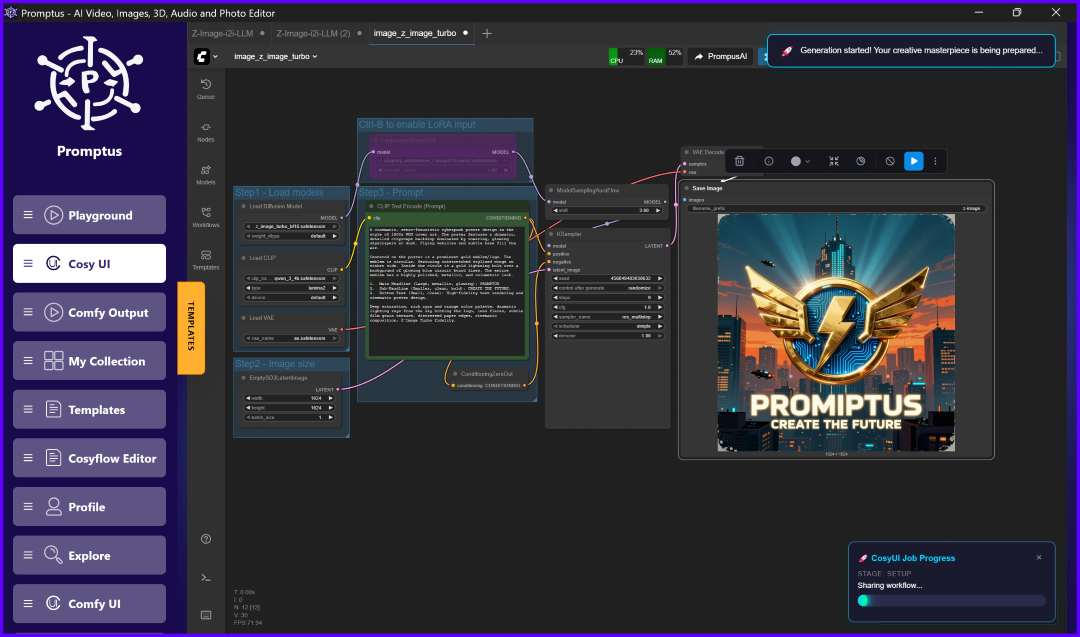
✅ 2. Load the Z-Image Workflow in Promptus
Promptus includes one-click workflow templates for:
- Z-Image Turbo (Text-to-Image)
- Z-Image Turbo (Image-to-Image)
- Z-Image Edit Workflow (when released)
- Z-Image Turbo + LoRA Loader
- Z-Image Turbo + ControlNet
To load one:
- Open Promptus
- Go to Workflows
- Click Import Workflow
- Select Z-Image Turbo Workflow (recommended)
You’ll see a visually organized node graph including:
- UNet Loader
- CLIP Text Encoders (positive & negative)
- VAE Loader
- ModelSamplingAuraFlow
- KSampler
- VAE Decode
- Save/Preview node
This is your full Z-Image pipeline.
✅ 3. Load the Required Models
When you first load the workflow, Promptus will automatically detect missing models.
You will be prompted to download:
1. Zimage Turbo UNet
File example:z_image_turbo_bf16.safetensors
2. Qwen-3 4B (CLIP Text Encoder)
File example:qwen_3_4b.safetensors
3. Zimage VAE
File example:ae.safetensors
Click Download All Models, and Promptus places them in the correct folders automatically.
✔ No file management
✔ No manual paths
✔ No directory confusion
After download, the workflow updates automatically.

✅ 4. Configure Your Prompt and Negative Prompt
Inside the CLIP Text Encode (Positive Prompt) node:
Type something like:
A cinematic portrait of a young woman standing in warm sunset light,
shot on a 50mm lens, ultra-realistic, detailed skin texture
Inside CLIP Text Encode (Negative Prompt):
blurry, distorted, bad anatomy, deformed hands, low-resolution, ugly
Promptus highlights your tokens and shows live text encoder feedback.
✅ 5. Choose Your Sampling Settings
Open the KSampler node.
Recommended settings for Z-Image Turbo:
- Seed: randomize
- Steps: 6–9 (Turbo excels at low steps)
- CFG: 1.0–3.0
- Sampler: Euler or Euler A
- Scheduler: Simple
- Denoise: 1.0
Promptus includes Z-Image presets you can load instantly.
✅ 6. Generate Your First Z-Image Creation
Once your prompt, sampler, and models are set:
- Press Run
- Watch the pipeline execute nodes in sequence
- See your result in PreviewImage
On a 16GB GPU, images usually generate in:
4–12 seconds
On a 4–6GB GPU (quantized GGUF):
10–20 seconds
Promptus automatically optimizes memory usage.
✅ 7. Using Z-Image for Image-to-Image (I2I)
Promptus includes a dedicated img2img workflow.
To use it:
- Click Load Image
- Drop in your source image (portrait, artwork, etc.)
- It flows into VAE Encode
- Adjust denoise in the KSampler:
- 0.2–0.4 → subtle edits
- 0.5–0.7 → medium changes
- 0.8–1.0 → dramatic remixing
- Run workflow
Z-Image performs high-quality:
- face fixes
- stylistic conversions
- retouching
- realism upgrades
- anime ↔ realism conversions
All with very few artifacts.
✅ 8. Using LoRAs with Z-Image
Promptus has built-in LoRA support.
To use one:
- Download a LoRA (from CivitAI, HF, etc.)
- Place in
/loras(Promptus can do this automatically) - Add a LoRA Loader node to the graph
- Connect it after the UNet Loader
- Set strength (0.5–1.0 recommended)
- Add trigger words to your prompt
You can chain multiple LoRAs together, such as:
- a portrait-style LoRA
- a face-enhancement LoRA
- a clothing/style LoRA
Z-Image handles all of them gracefully.
✅ 9. Tips for Best Results
✔ Use shorter prompts
Z-Image understands world concepts extremely well — no need for long SDXL-style strings.
✔ Keep steps low (6–9)
Z-Image Turbo is built for speed.
✔ Use strong negative prompts
It responds well to clear exclusion terms.
✔ Try different camera styles
Examples:
- 50mm portrait
- IMAX wide-angle
- Fujifilm aesthetic
- F2.0 shallow DOF
✔ Experiment with denoise strength
This dramatically alters artistic output.
🎉 You’re Ready to Create with Z-Image in Promptus
You now know how to:
✔ Load a Z-Image workflow
✔ Install necessary models
✔ Write strong prompts
✔ Adjust sampler settings
✔ Use img2img
✔ Load LoRAs
✔ Optimize for your GPU
Promptus makes Z-Image easier to use than any standalone ComfyUI installation — and unlocks its full potential for creators, artists, and developers.


