
%20(2).avif)
%20transparent.avif)

Complete setup with troubleshooting for local and cloud execution.
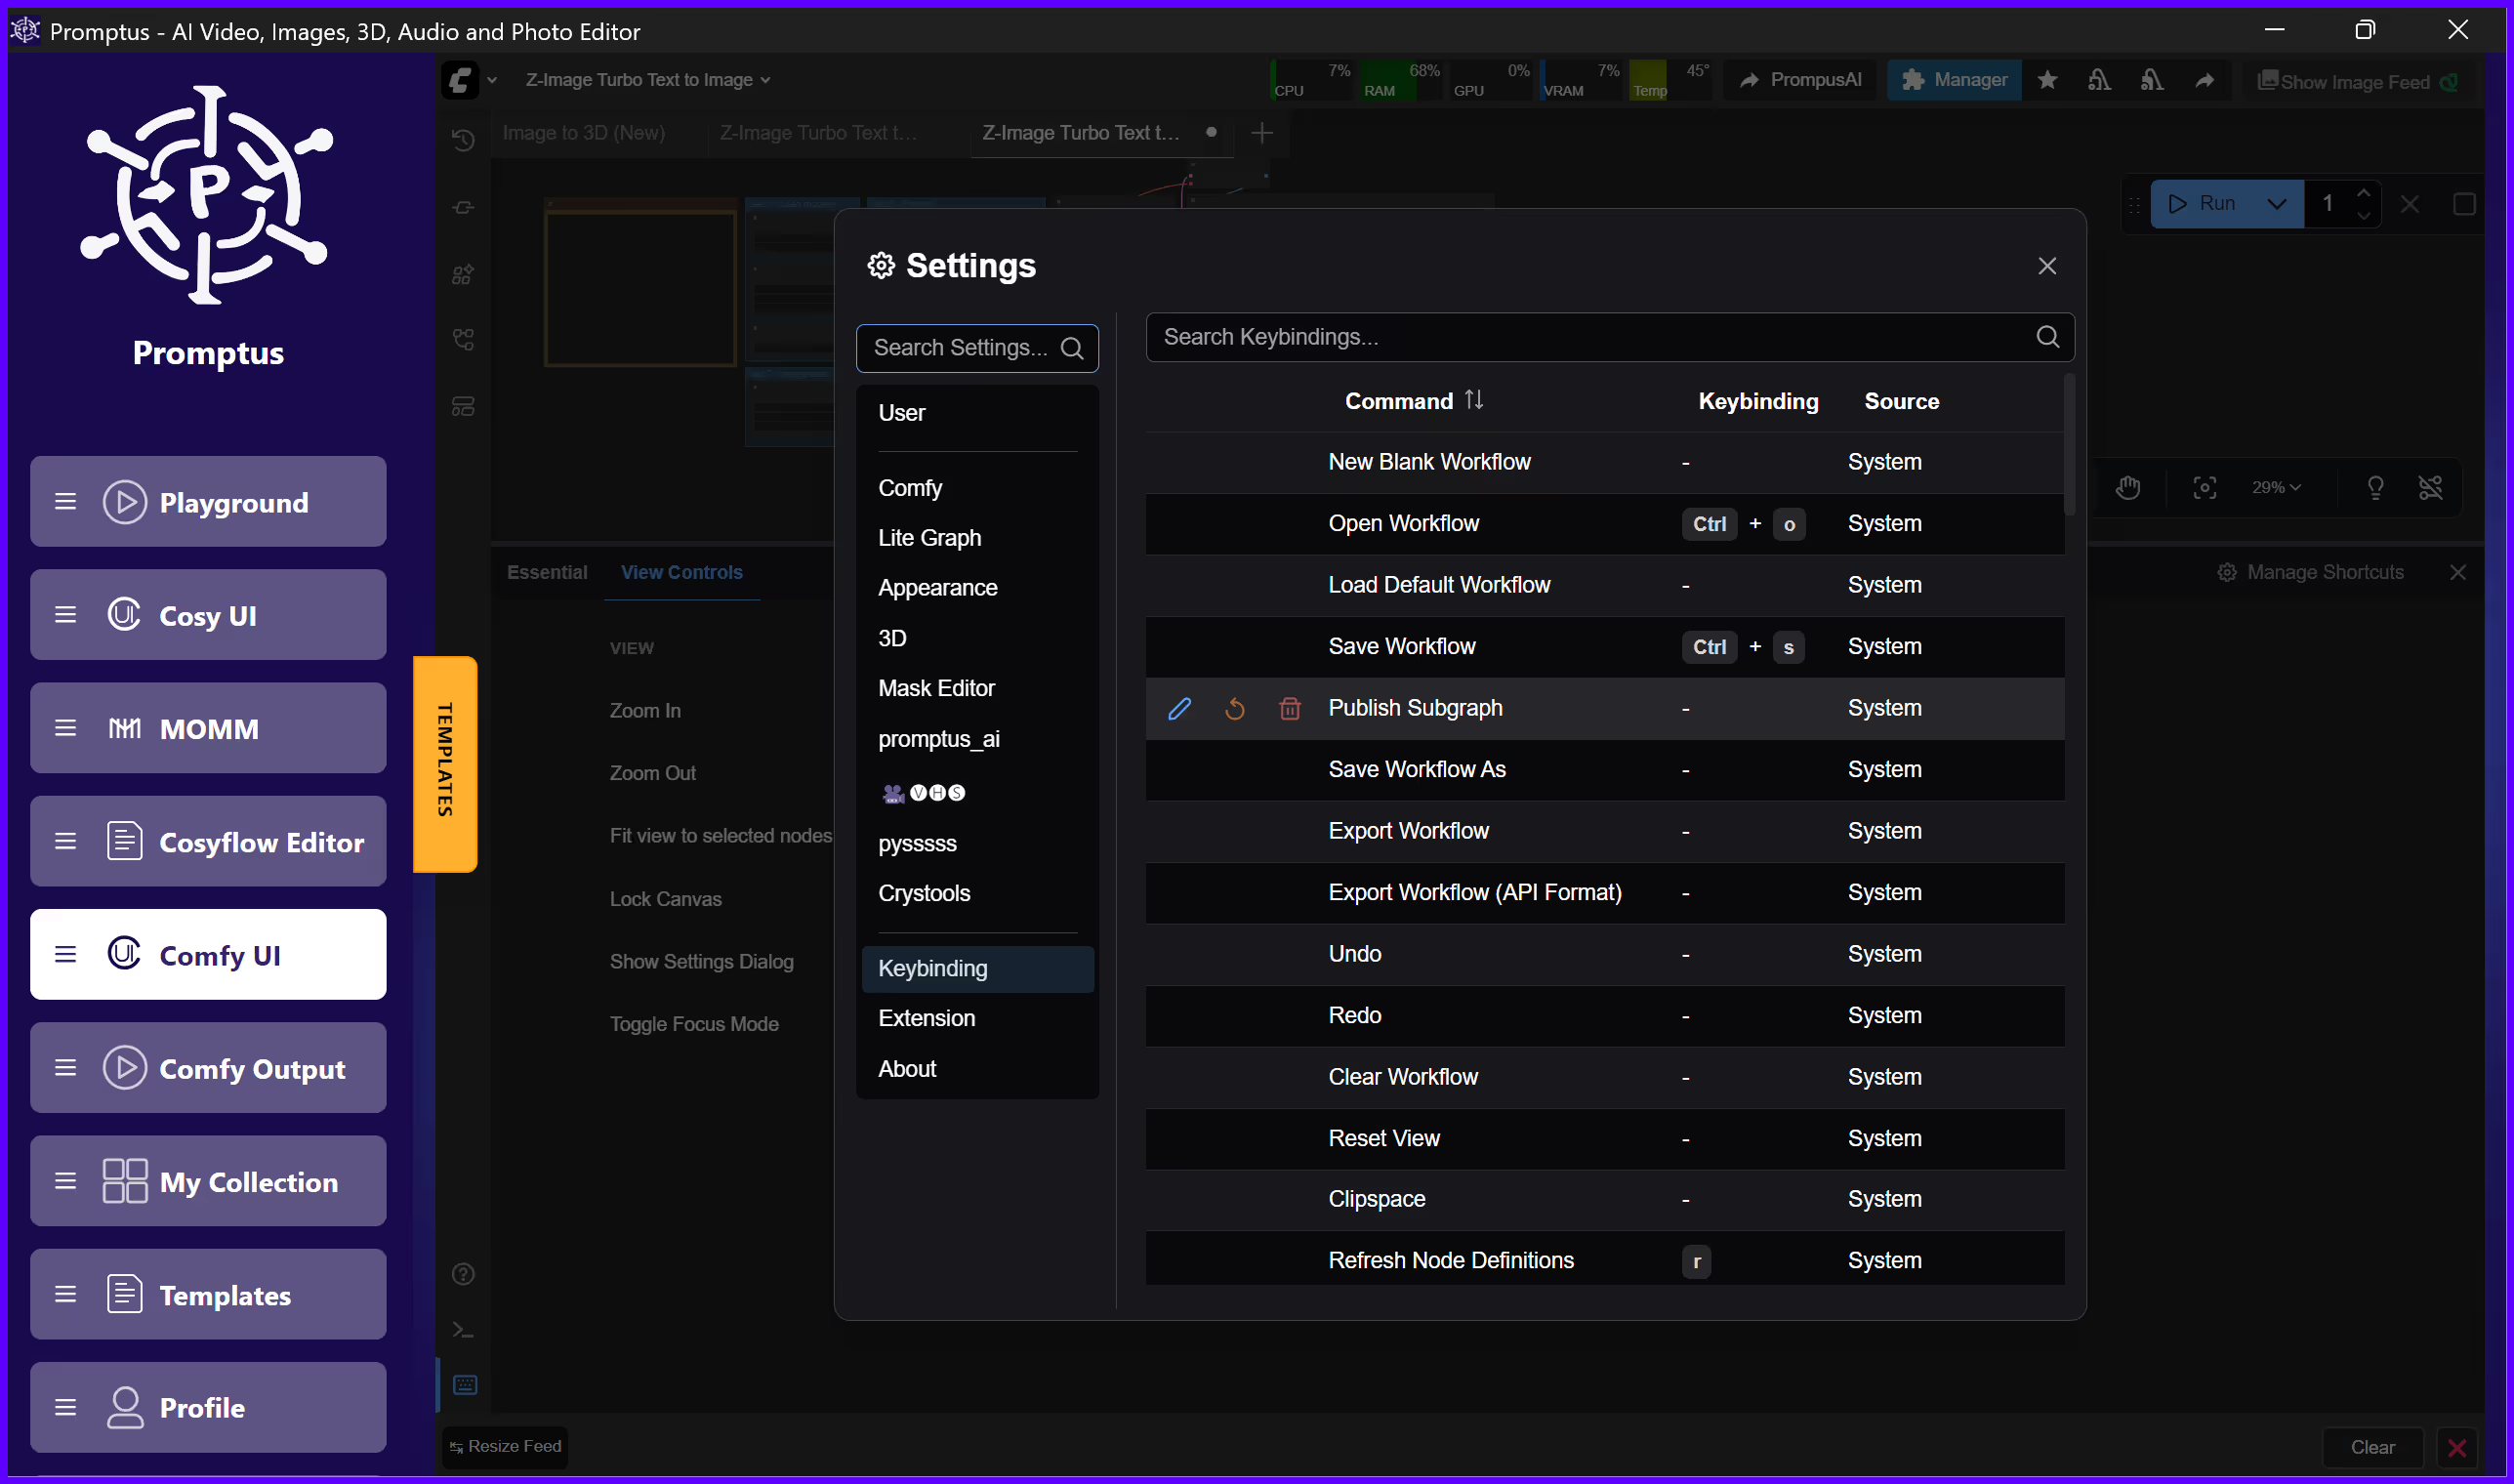
If you're working with Promptus with ComfyUI—a system that makes advanced node-based workflows accessible to studios and solo creators—the ComfyUI Manager becomes essential for installing custom nodes, managing dependencies, and keeping workflows stable.
This guide covers:
- Complete setup
- Realistic troubleshooting
- Practical decisions about local vs cloud execution
🎯 What You Will Build or Learn
- ✅ Install and verify ComfyUI Manager in Promptus Web and desktop
- 🧩 Add custom nodes (including ControlNet) without terminal access
- 📦 Manage model files and dependencies automatically
- 🛠️ Troubleshoot common installation failures with specific fixes
- ☁️ Decide when local execution makes sense versus cloud scaling
- 🎨 Build a ControlNet workflow with realistic parameter ranges
📋 Prerequisites
- 🔐 Promptus Web account or Promptus App installed locally
- 🖥️ At least 8GB VRAM for local testing or willingness to use cloud compute
- 🌐 Internet access for ComfyUI Manager node discovery
- ⚠️ Awareness that some custom nodes support only specific model architectures (SD 1.5 vs SDXL matters)
🧭 Step-by-Step Setup
🔎 Verify ComfyUI Manager Is Active
- Open Promptus
- Click the ⚙️ Settings icon (top-right)
- Navigate to Extensions
- Ensure ComfyUI Manager is enabled
- Restart Promptus (refreshing is not enough)
✅ Verification step:
- Open a blank workflow
- Right-click → you should see “Manager”
- If missing:
- Check browser console (
F12) - Or desktop logs folder in your Promptus install directory
- Check browser console (
🔄 Access and Update the Node Database
- Right-click canvas → Manager
- Open Install Custom Nodes
- Click Fetch Updates
⏳ Notes:
- Takes 30–90 seconds
- Do not close the panel
- Interrupting this step can corrupt the local cache
📂 Configure Installation Paths
- Open Manager → Settings
- Default paths:
ComfyUI/custom_nodesComfyUI/models
- Optional: set custom paths if managing multiple projects
📌 Path rules:
- Use absolute paths
- Windows example:
C:/Projects/ComfyUI/custom_nodes - Mac/Linux example:
/home/username/comfyui/custom_nodes
🔁 Save and restart Promptus
🧩 Install Your First Custom Node
- Search for “efficiency”
- Select Efficiency Nodes for ComfyUI
- Confirm model compatibility
- Click Install
⏱️ Installation time:
- Simple nodes: 10–30 seconds
- Complex nodes: 2–5 minutes
⚠️ Do not interrupt installation
🔄 Refresh node list after install
🎛️ Building a Practical ControlNet Workflow
🧠 Install Core ControlNet Components
- Search “ControlNet”
- Install ComfyUI-Advanced-ControlNet
- Refresh node list
- Verify nodes:
- Load ControlNet Model
- Apply ControlNet
- Preprocessors
📥 Download ControlNet Models
Examples:
- SD 1.5 →
control_v11p_sd15_openpose - SDXL →
control-lora-canny-rank256
📦 Models download to:ComfyUI/models/controlnet
📏 Size: 700MB–2.5GB
🧱 Build the Workflow Structure
Add these nodes:
- 🖼️ Load Image
- 🧪 ControlNet Preprocessor
- 📥 Load ControlNet Model
- 🎛️ Apply ControlNet
- 🎨 Standard generation nodes (Checkpoint, CLIP, KSampler)
🔗 Connect in sequence:
- Image → Preprocessor → Apply ControlNet → Conditioning chain
🎚️ Configure ControlNet Parameters
🔥 Key Parameters
Strength
- Start:
0.7 - Range:
0.0 – 2.0 - Sweet spot (portraits):
0.65 – 0.75
Conditioning Strength
- Start:
0.8 - Range:
0.0 – 1.0 - Higher values = ControlNet dominates early sampling
📌 Practical findings:
0.5: Control barely visible0.9: Distortions appear0.65–0.75: Best balance
🧪 Example: Product Visualization Workflow
- Use Canny edges from a lighting reference
- Strength:
0.8 - Conditioning strength:
0.85 - Prompt defines product details only
🎯 Result:
- Lighting stays consistent
- Variations driven purely by prompt changes
- Ideal for e-commerce batch generation
🧠 Why This Works
ControlNet modifies noise prediction during denoising, not before or after.
- Preprocessor = what structural info is passed
- Strength = how much ControlNet overrides the model
Wrong preprocessor = irrelevant control signal
🧭 ControlNet Preprocessor Decision Guide
✏️ Canny Edges
- Best for: Architecture, products
- Strength:
0.7–0.9 - Pros: Fast, lighting-agnostic
- Cons: No texture or color
🌍 Depth Maps
- Best for: Environments, spatial layout
- Strength:
0.6–0.8 - Pros: Preserves spatial relationships
- Cons: Struggles with reflections
🧍 OpenPose
- Best for: Characters, animation
- Strength:
0.7–0.9 - Pros: Pose control with style freedom
- Cons: Human-only, hand limitations
✍️ Scribble / Sketch
- Best for: Concept exploration
- Strength:
0.5–0.7 - Pros: Maximum creative input
- Cons: Manual effort required
🛠️ Common Mistakes and Fixes
❌ Nodes Don’t Appear
- Fix:
F5→ restart Promptus → verify paths
❌ ControlNet Model Missing
- Fix: Check model folder and extension
❌ Local Works, Cloud Fails
- Fix: Remove absolute paths, run cloud validator
❌ Out of Memory
- Fix: Batch size = 1, lower control image resolution, use ControlNet LoRAs
❌ Control Ignored
- Fix: Check connections, increase strength, verify control image content
❌ Node Fetch Failed
- Fix: Check internet/firewall, retry after rate-limit cooldown
❌ Python Errors
- Fix: Use Update All, install missing packages
❌ Multiple ControlNets Freeze
- Fix: Lower secondary strengths, reduce resolution
🚀 Advanced Variations
🧬 Multi-ControlNet Layering
- Depth (
0.7) + Canny (0.5) - Best for architecture
- Trade-off: High VRAM usage
🎞️ Animated ControlNet
- One control image per frame
- Same model, same parameters
- Ideal for motion graphics
- Setup-heavy, but powerful
Local versus cloud execution decision guide
Privacy and data control
Local execution: Complete privacy, files never leave your system, no data exposure risk, suitable for client work under NDA.
Cloud execution: Files temporarily stored on marketplace GPU systems, deleted after job completion, not suitable for confidential projects without verification of provider's data handling policy.
Cost structure
Local execution: Zero per-generation cost after hardware purchase, electricity usage (approximately 0.30 to 0.50 USD per hour for a 4090), hardware depreciation over time.
Cloud execution: Pay only for compute minutes used (approximately 0.50 to 2.00 USD per hour depending on GPU tier), no electricity or maintenance costs, no upfront hardware investment.
Speed and throughput
- Local execution: Instant job start, no queue wait, ideal for iterative work with frequent small changes, limited by single GPU throughput.
- Cloud execution: Possible queue wait during peak times, ideal for large batches running overnight, access to multi-GPU configurations for parallel processing.
Reliability and availability
Local execution: Complete control over uptime, vulnerable to power outages and hardware failures, maintenance responsibility falls on user.
Cloud execution: Dependent on marketplace provider uptime, no maintenance burden, redundant systems reduce single-point failures.
Setup and maintenance effort
Local execution: Requires initial hardware purchase and setup, occasional driver updates, manual management of model files and disk space.
Cloud execution: Zero hardware setup, automatic software updates, model files managed by provider or uploaded per project.
Decision point: Batch size and frequency
If you generate fewer than 100 images per week: Local execution likely costs less over time if you already own suitable hardware.
If you generate 500+ images per week consistently: Cloud execution becomes cost-effective, especially factoring in electricity and cooling costs.
If you generate large batches monthly but not daily: Hybrid approach works best—prototype locally, scale in cloud for production batches.
How to do this in Promptus🧩
The Promptus desktop app and browser-based Promptus Web both support ComfyUI Manager without modification. The key advantage in Promptus is that GPU Marketplace integration lets you build workflows locally with ComfyUI Manager, test them with your local GPU, then scale the same workflow file to cloud resources without reconfiguration.
When exporting workflows for marketplace execution, use the validation tool in File menu under Export for Cloud Execution. This scans your workflow for absolute paths, missing models, and unsupported nodes. Fix any flagged issues before uploading—the validator catches problems that would otherwise fail hours into a batch job.
If you're coordinating team workflows, Promptus's workspace sharing lets multiple users access the same ComfyUI Manager configuration. Install nodes once, and team members inherit the same environment. This prevents "works on my machine" issues common in distributed creative teams.
🔗 Sign up: https://www.promptus.ai
ComfyUI Manager eliminates most of the technical friction in expanding your Promptus capabilities. Once you understand node installation, model management, and the hybrid execution model, you can adapt workflows as new techniques emerge without waiting for platform updates. The ControlNet workflow demonstrates best practices across various project types, ensuring that your pipeline remains efficient, stable, and scalable.


